

3rd Person Follow, Orbital, Tracked Dolly and Transposer in Cinemachine
Let’s explore the powerful options that come with Cinemachine Body settings and sub-settings. There are a variety of Follow functions to satisfy your cinematic needs.
Follow
As discussed in previous articles, the first thing you need when using the Follow function in a virtual camera, is to assign a target in the inspector.

Body Settings
3rd Person Follow
The camera tracks the movement and rotation of the target, at a constant position. That position of course can be adjusted using the Damping settings.

Rig
Shoulder Offset values are great for finding the ideal position behind the player, and works in local space to the target.
Vertical Arm Length is the vertical offset of the hand compared to the shoulder. The Arm Length will impact the screen position of the target being followed when the camera rotates vertically.
Camera Slide will dictate if the camera is positioned to the left of the target (0), or to the right (1).
Camera Distance dictates how far behind the hand the camera will be positioned.
Obstacles
Camera Collision Filter can be used to tell the camera what objects it can and can not, collide with.
Ignore Tag can be used to ignore collisions with objects of the designated tag.
Camera Radius is the clipping plane for the camera based on distance to objects.

Framing Transposer
The framing transposer is unique, because it has all of the Aim features built in, and is ideal for a 2D side-scrolling game camera. Unlike some of the other Body settings, the framing transposer will prohibit the camera from moving around the target, which is great for those side-scrollers. Having the Aim features built in is a perfect one-stop-shop for adjusting how you would like the camera to follow the player. For more info on how the Aim features work, please reference my article here https://jaredamlin.medium.com/aiming-features-in-cinemachine-8ee0557de480. While the framing transposer was designed for 2D and orthographic cameras, it works just fine in 3D environments as well. One note about the framing transposer, if for it to work correctly, the LookAt assignment needs to be empty.


Hard Lock to Target
This setting ignores the rotation of the target, and uses the position of the target as it’s own position. Basically, this is a great option for mounting the camera to an object. Damping is the only available adjustment, being that this is a specific case use setting, and the other positioning elements are not available.

Orbital Transposer
The orbital transposer has the same Binding Modes as the Transposer, which I will get into when I cover the Transposer settings. The orbital transposer will move around the target in a circular direction. It has a Follow Offset and Damping adjustments. The Heading, Definition, Target Forward, means that the assigned target’s forward vector will be inherited by the camera. The default Value Range going from -180 to 180 (360), while having Wrap enabled, lets the camera move in a full 360 degrees around the target. Decreasing the Value Range will limit how far around the target the camera will be able to travel. An important note for the orbital transposer, is that it needs a LookAt target to work properly.

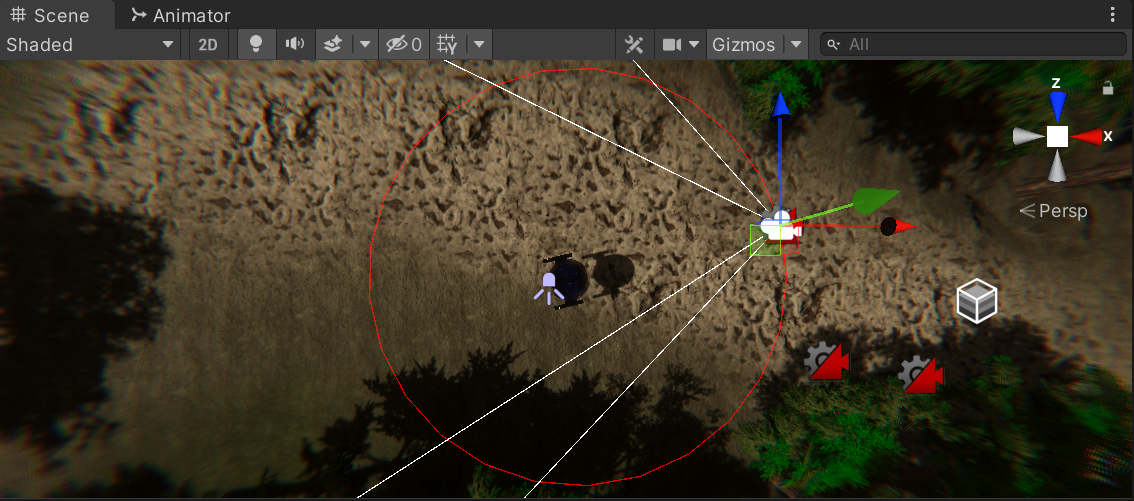
Tracked Dolly
The tracked dolly should use a LookAt target, but does not use the Follow assignment. The Path assignment, which needs to be created, is what gets followed. There are typical Damping and Offset options concerning the cameras relation to the path. The camera will move between user predefined waypoints, on it’s voyage from the beginning of the path to the end. The Path Position assignment will reflect the desired Waypoint for your cameras position.

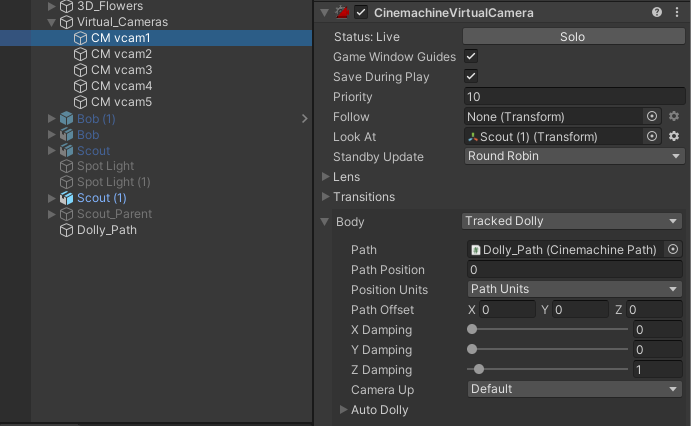
Path Position: This value represents the current position along the Tracked Dolly, based on Waypoint or Distance along the Path.


Position Units
Path Units: The Path Position is defined specifically by the Waypoint positions. Each Waypoint represents a different ascending Path Unit.
Distance: References the Length of the Path with a Float value.
Normalized: Similar to Distance, only the value is clamped between 0 and 1, from the beginning of the path to the end.
Auto Dolly
Enabled: The camera will automatically move between the beginning and end of the path, based on the closest distance to the target.
Creating a Path
Add an Empty GameObject to your scene to hold your Path.

Add a new Component of Type CinemachinePath.

A new Path with 2 default Waypoints.

Add and edit Waypoints along the path for the camera to follow.


Each Waypoint has a Widget that changes it’s position, and another that is used like a curve adjustment tool, to edit the curve of the path between waypoints.


Transposer
The transposer comes equipped with Follow Offset and Damping adjustments. Similar to the Orbital Transposer, the Binding Modes are what offer some serious power here.

Binding Modes
Lock to Target on Assign: This option will tell the virtual camera to follow a target using it’s local position, as soon as the camera is enabled or a target is assigned to Follow. When in this mode, the camera will not rotate with the target.
Lock to Target on World Up: This setting locks the camera to the target with the tilt and roll values set to zero. All target rotations are ignored except for the Yaw rotation, which is akin to a door opening. The camera will however move around the target as it changes rotation.
Lock to Target No Roll: This setting works much how it sounds, locking the camera to the target locally with a roll value of zero.
Lock to Target: With this setting selected, the camera will keep it’s offset by rotating around the target. The camera will also rotate when the target rotates, while staying locked to it.
World Space: The camera offset when using this selection will be based on the origin point of the target. When the target rotates, the camera won’t change position.
Simple Follow with World Up: This option will use the local camera space for offset and damping. This setting is basically cinemachine doing an impression of a human camera person following a target.
Well, this concludes this voyage into the Body settings in cinemachine virtual cameras. I hope you enjoy making cinematic cuts and thanks for reading!

